I love using my Distressors! They just work on everything. They can go from transparent dynamic taming to CRUSHING the signal to add some grit. They are my go to compressor for drums, room mics, and quite excellent on electric guitars too.
However, recently I found that my Distressor’s were “forgetting” their settings!? After turning off the Distressors for the night I’d come back the next day and they’d start up in their default settings. Weird right? Obviously, the knobs would still be set up as I left them, but all the settings controlled by the buttons were wrong. Aside from being super annoying I was hoping that this wasn’t a sign that my units had bigger problems.
I called up Dave Derr at Empirical Labs to see what was going on. As it turns out, there is a simple solution to this really annoying problem. I described to Dave what was going on and he seemed to believe that the memory capacitors in both my units were going out. Luckily, Dave told me that “this does NOT affect the audio, nor can it cause any damage to your product.” Phew! That’s a relief! At least nothing major is wrong. So, I guess that if your Distressors are acting up and you don’t mind manually recalling the settings you’ll be just fine. Keep that soldering iron tucked away. However, I definitely wanted to get my units back to operating at peak performance. Plus, taking a look under the hood is always fun!
What Needs Fixin’
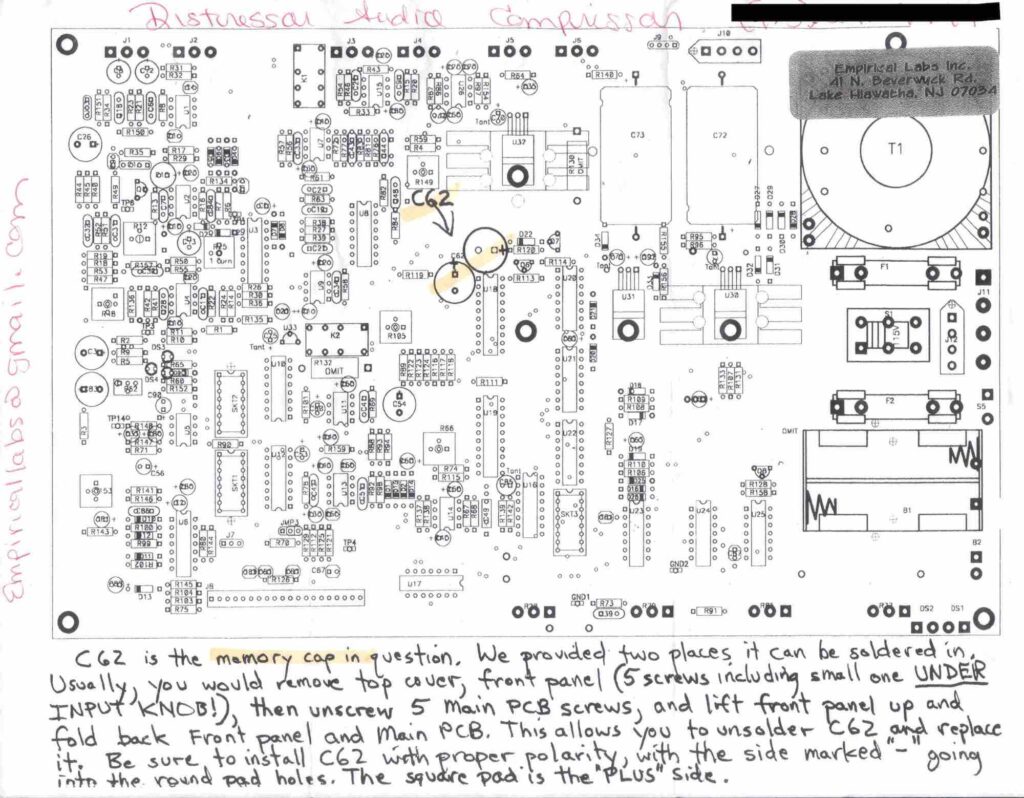
The capacitor that needs to be replaced is C62. It’s not too difficult to get to. Take a look at the circuit layout. C62 is right in the middle of the board.

Now for the nitty gritty. Let’s crack this guy open and change out that cap! Here is what you’ve got to do:
Replacing Distressor Memory Capacitor
- Remove the lid. There are several obvious screws on top of the unit
- Remove the four white knobs. INPUT, ATTACK, RELEASE, & OUTPUT
- Remove the screw located behind the INPUT knob
- Take the circuit board out by unscrewing the four corner screws and a fifth screw in the center of the board
- Locate the memory capacitor. C62 on the circuit diagram
- Tilt up the circuit board to access C62’s solder pads
- Heat up the pads with a soldering iron while gently wiggling and pulling the capacitor from the other side of the board
- Take a look at the value of your cap so that you can find a replacement. For a memory cap the value can be approximated, so don’t stress out if you’ve got a capacitor on hand that is close but not the exact same value.
- Solder in that new cap and put your Distressor back together
- You’re done! Pour yourself a whiskey and decompress while you compress
Conclusion
Thanks to Dave for helping me out with this one. Not only does Empirical Labs make great gear, but the owner is a stand up guy. I’m glad it’s such an easy fix. Little things acting up like this at the studio drive me ABSOLUTELY crazy!
Have an idea for a video or article?
Drop me a line and let’s learn something cool together!

